Buckwheat & Pecan Caramel Apple Pie

A rich & nutty pie for your Autumn table.

……….

Butter Caramel Sauce

-6 Tablespoons butter

-3/4 cup sugar

-1 cup Heavy Cream

-1 Tablespoon Vanilla Extract

-Big pinch of Sea Salt

To make the caramel: Melt butter in a medium saucepan over medium heat, add sugar and allow to cook with butter until a dark amber color. Remove from heat and slowly whisk in cream, then vanilla and a big pinch of salt. Allow to cool while you prepare your crust and apples.

Buckwheat & Pecan Crust

-2 cups buckwheat flour

-1 cup pecans

-1/4 cup arrowroot starch

-pinch of sea salt

-2 sticks unsalted butter, cold & cubed

-1/2 - 3/4 cup ice cold water (enough to bring your dough just together, but not sticky)

-1 egg

-2 Tablespoons sugar

To make the crust: In a food processor, blitz together flour, starch, nuts & salt until a fine crumble. Then add your cold cubed butter and pulse until fully incorporated into pea sized butter chunks. Slowly add your water and continue to pulse until it all just starts to come together, not too wet! Divide your dough into one slightly larger disc (this will be your base crust), and one smaller disc (this will be your top crust) and sandwich each disc between two pieces of parchment paper. Then roll out each disc to the about 1/4 inch thick round, or as wide around as will fit in your pie plate. Refrigerate both rolled out crusts keeping them sandwiched in the parchment while you prepare your apples.

Apple Filling

-8-10 medium to large Mac or Cortland Apples

-2 Tablespoons Cinnamon

-1 Tablespoon Lemon Juice

To prepare your filling: Peel, core and thinly slice your apples in a large bowl. Then coat with cinnamon and lemon juice.

Time to Assemble

Preheat oven to 350 degrees. Remove your chilled pie crusts, and gently peel back top layer of parchment from each crust, then flip larger crust onto your pie pan, and gently tuck it in to fit, allowing edges to lay outside the rim of the pan. Fill crust with your spiced apples, then pour all of your cooled caramel over the apples. Flip your smaller crust over the top of the pie and roll overhanging bottom edges of crust up and over your top crust, all the way around, sealing your pie in. Leave the crust round, or dimple it as you please! In a small bowl, whisk your egg, and then brush over the top of your crust, followed by sprinkling 2 tablespoons of sugar over egg wash. Cut decorative slits on the top of the pie so it doesn’t explode in the oven, and bake for about an hour or until crust in a dark golden color and filling is bubbling at the edges. Allow to cool for about an hour before cutting into it, enjoy with warm custard, whip cream, ice cream, or all three :)

Spiced Carrot Cake with Honey Cream Cheese Frosting

A gently spiced cake to celebrate spring, a special person in your life, or a Tuesday afternoon!


For the Cake:

1 3/4 cup flour (gf works too)

2 teaspoons baking powder

1 teaspoon baking soda

1 teaspoon cinnamon

1/2 teaspoon freshly gated nutmeg

1/2 teaspoon ground ginger

1/2 teaspoon ground cardamom

1/2 teaspoon salt

1/2 cup honey

3/4 cup melted coconut oil

3 eggs

1 tablespoon vanilla

5 cups finely shredded carrots

3/4 cup chopped pecans

3/4 cup shredded coconut

………………..

Preheat oven to 350 degrees, grease two 9” cake pans with coconut oil, and line the bottoms with parchment paper.

Combine all dry ingredients in a large mixing bowl, then add your shredded carrot into the dry ingredients and thoroughly combine. Meanwhile in a medium mixing bowl whisk together coconut oil, honey and vanilla. Gently whisk in eggs one at a time until just combined. Pour wet ingredients over dry mix, and gently fold together until almost fully incorporated. Then add pecans and coconut, and finish folding your batter until completely combined.

Divide your batter between your two cake pans, bake for 25-30 minutes, or until a toothpick comes out clean when poked through the center. Allow your cake to cool for at least an hour, until thoroughly cool to the touch. Meanwhile, make your frosting!


For the Frosting:

8oz cream cheese, at room temp

2 sticks butter, at room temp
1/2 cup honey

1/2 cup powdered sugar

2 teaspoons vanilla

big pinch of salt

Handful of edible flowers (optional)

……….

In a stand mixer with the whisk attachment, or a large mixing bowl with an electric whisk combine all of your ingredients. Whisk together on medium-high for 2-4 minutes until completely smooth and velvety.

Spread approx. 1 cup of frosting on top of your first cake round, and spread to within about an inch from the edge of the round. Top your first round with your second cake round, with the bottom of the round as the top of the cake. Spread a very thin layer of frosting around the sides of the cake, and use the remaining frosting to create a thick layer of frosting on top. Sprinkle your edible flowers on top (if using) and enjoy!


Humble Kitchari

Kitchari has been long been revered as a traditional Ayurvedic food, celebrated for it’s warming, easily digestible, and healing properties. I like to keep mine simple and add in seasonal greens at the very end. To step up this bowl of nourishment, I often add braised beef or pork on top.

KITCHARI

Makes 8-10 servings

Cooking Time: 1 hr

INGREDIENTS

2 cups Moong Daal

1 cup Basmati Rice

2 tablespoons Coconut Oil or Ghee

1 tablespoon grated fresh ginger

1 teaspoon cumin seed

1 teaspoon mustard seed

1 teaspoon ground cumin

1 teaspoon ground coriander

1 teaspoon tumeric

10 cups water

1 Bunch seasonal greens of choice, chopped (I like Collards, Kale, Swiss Chard or Spinach)

Sea salt to taste

Freshly ground black pepper

To Make:

In a large bowl, rinse both moong dal and rice thoroughly with cold water, straining water out with a colander. Repeat as many times as needed to achieve an almost clear water rinse.

In a large pot over medium heat, melt coconut oil or ghee, and add in all of your spices. Gently toast for 1 minutes, then add in your moong dal and rice. Toast all together for an additional minute. Pour water over, place lid on pot, and allow to come up to a gentle simmer. Turn your pot down to low heat, and allow to cook gently for about 40 minutes, stirring every ten minutes. Once your pot of Kitchari is looking like a thick soup, add your greens, and cook for another 5 minutes. Taste your Kitchari-does it have a little bite/crunch to it? Add a bit more water and continue to cook 5-10 more minutes. You want it to be fully cooked and on the edge of mushy. Once you have reached that state of mush, remove from heat and it is time to season your pot! I like my kitchari well seasoned, and typically use 1-2 tablespoons of salt, and 1 tablespoon ground pepper. Start with a tablespoon of both salt and pepper, stir well, and taste. Do you feel like it needs a bit more salt? Slowly work up to an additional tablespoon, based on your liking.

You did it! Now go enjoy your bowl, and feel happy that you have leftovers for days to come!

Did you enjoy this recipe? Please consider donating to

Black Home Birth Matters ATX

Quiche with Spring Greens & Caramelized Onions

IMG_3421.jpg

One of my very favorite meals to bring to a new mother is Quiche. Quiche is a choline, protein and vitamin rich meal, packed with lots of good fat, and can be eaten at absolutely any time of day, with one hand. I also love that it can be tailored to both gluten free folks (I sub gluten free flour for AP, and roll out between parchment paper), as well as vegetarians by simply leaving out meat. Essentially the perfect meal for all new mamas. This variation is a celebration of the tender spring greens that will soon be readily available here in Maine, but please feel free to add cooked up bacon, sausage or ground beef to make it a real hearty meal.

Caramelize your Onions

…………

3 large yellow onions, sliced thinly

2 tablespoons butter, lard or olive oil

In a large saute pan or cast iron skillet, cook your onions and fat over medium heat until they start to get a little color. Turn the heat down to very low, and let onions cook until they are caramel colored and translucent-this will take an hour or so. Remove from heat, and let cool while you prepare the crust

Make the Crust

……….

1 1/4 cup AP flour

1 stick cold unsalted butter, cubed

1/2 teaspoon sea salt

1/2 cup cold water

You can certainly mix this dough by hand, but my favorite method for all doughs is our food processor. It allows for a very speedy mix, keeping the butter cold, as well as very minimal working with my hands, which will yield a flakier crust. Place flour, butter, and salt in food processor. Pulse until butter is pea-sized. Pour 1/2 cup water over your flour butter mixture, and pulse until you see the dough just come together. Turn out onto a piece of wax paper or parchment, and gently pat into a 1 inch thick disc, and wrap up in your paper. Place this disc into the freezer while you prepare your fillings. You can also make this dough ahead of time, and keep in the fridge for up to a few days.

……….

PREHEAT OVEN TO 350 DEGREES

……….

Prepare your other Fillings

……….

1 cup shredded cheddar or gruyere cheese

1 bunch tender kale, spinach or swiss chard, roughly chopped

8 pasture raised eggs

2/3 cup heavy cream or whole milk

1 Tblsp sea salt

1 teaspoon pepper

In a medium sized bowl, crack your eggs, add your dairy, salt & pepper, and whisk until all eggs are completely broken, and mixture is cohesive. Set aside while you roll out your dough.

Roll out your Dough

……….

Lightly flour your work surface, and get out your pie pan so that you can use to approximate the size of your rolled out dough. Roll out dough, so that it is about 2 inches wider than the diameter of your pie pan. To transfer dough, I like to fold the dough over itself and quickly lay on one side of the pie pan before folding back the other side. Your dough should have a healthy extra amount of dough reaching beyond the edge of your pan

IMG_3489.jpg

Now begin filling your pie crust with your fillings! I like to have the raw greens at the very bottom of the pie, so that they gently steam themselves while the rest of the pie is cooking above.

IMG_3408.jpg

Now pile your caramelized onions on, and cover the onions with with your cheese. Now you are going to pour your raw egg mixture slowly over all of your fillings. Then gently fold the edges of your excess dough over and towards to the center of your pie.

IMG_3410.jpg

Place your pie in the oven, and cook for 1 hour. After 1 hour, poke the center of the pie and gently pull back the filling. You will know if the pie is done, if the filling holds and no raw egg is visible. Let cool for about 10 minutes before cutting. Enjoy!

……….

REPARATIONS

As always this recipe is free, but I ask you to please consider offering reparations in the place of compensating me for this content. I want to continue to lift up a GoFund Me for a local Penobscot woman, expecting her first child this year. Please follow the link and give what you can. Many thanks!

Go Fund Me for Mitchell

Lactation Chocolate Covered Stuffed Plums

One of my absolute favorite bedside snacks during postpartum was dried/rehydrated plums* from Fruit Bliss. Yes, dried plums are another name for prunes, but as prunes tend to get a bad rap, I’m going to stick to calling these little jewels dried plums to keep the appeal factor high. They are like little jammy gooey tart/sweet bombs, and I just can’t rave about them enough! This indulgent version of them is a wonderful bite for any time of day, and incorporates my favorite lactation chocolate-raw cacao rich in antioxidants, and coconut oil which is a galactagogue, and an incredibly beneficial fat to consume postpartum.

Ingredients:

1 package Fruit Bliss Plums** (you can use another brand or any dried fruit really, but I can’t vouch for the same level of tastiness)

Nut Butter of choice-I like hazelnut for these, but almond or peanut will also be great!

2 Tablespoons coconut oil

2 Tablespoons raw cacao

2 teaspoons honey or maple

1 generous pinch of sea salt

**Local Maine folks! You can get these at the Belfast Coop, as well as Royal River Natural Foods in Freeport.

Over very low heat, in a small saucepan gently melt coconut oil until just melted. Remove from heat and gently whisk in cacao, honey and sea salt. It will take a minute or two to full incorporate the ingredients, but don’t rush it-this can cause the mixture to separate-whisk nice and gently until the the mixture looks smooth and uniform. Set aside while you are stuffing your plums!

Time to stuff your plums! This is the most difficult part of this recipe, and its not too difficult, just messy! If you’ve got a little kiddo in the house-this is a great project for them!

With a chopstick, scoop a very small amount of your nut butter, and poke into the hole of the plum. I like to identify where the hole is before loading up my chopstick. Continue to poke small amounts of nut butter into the hole of the plum, until it feels a little plump-approximately 1/2 teaspoon worth. Go ahead and stuff as many plums as you like, but keep in mind you have enough chocolate to coat 6-8 of them. The rest can be set aside for less luxurious, but still delicious snack.

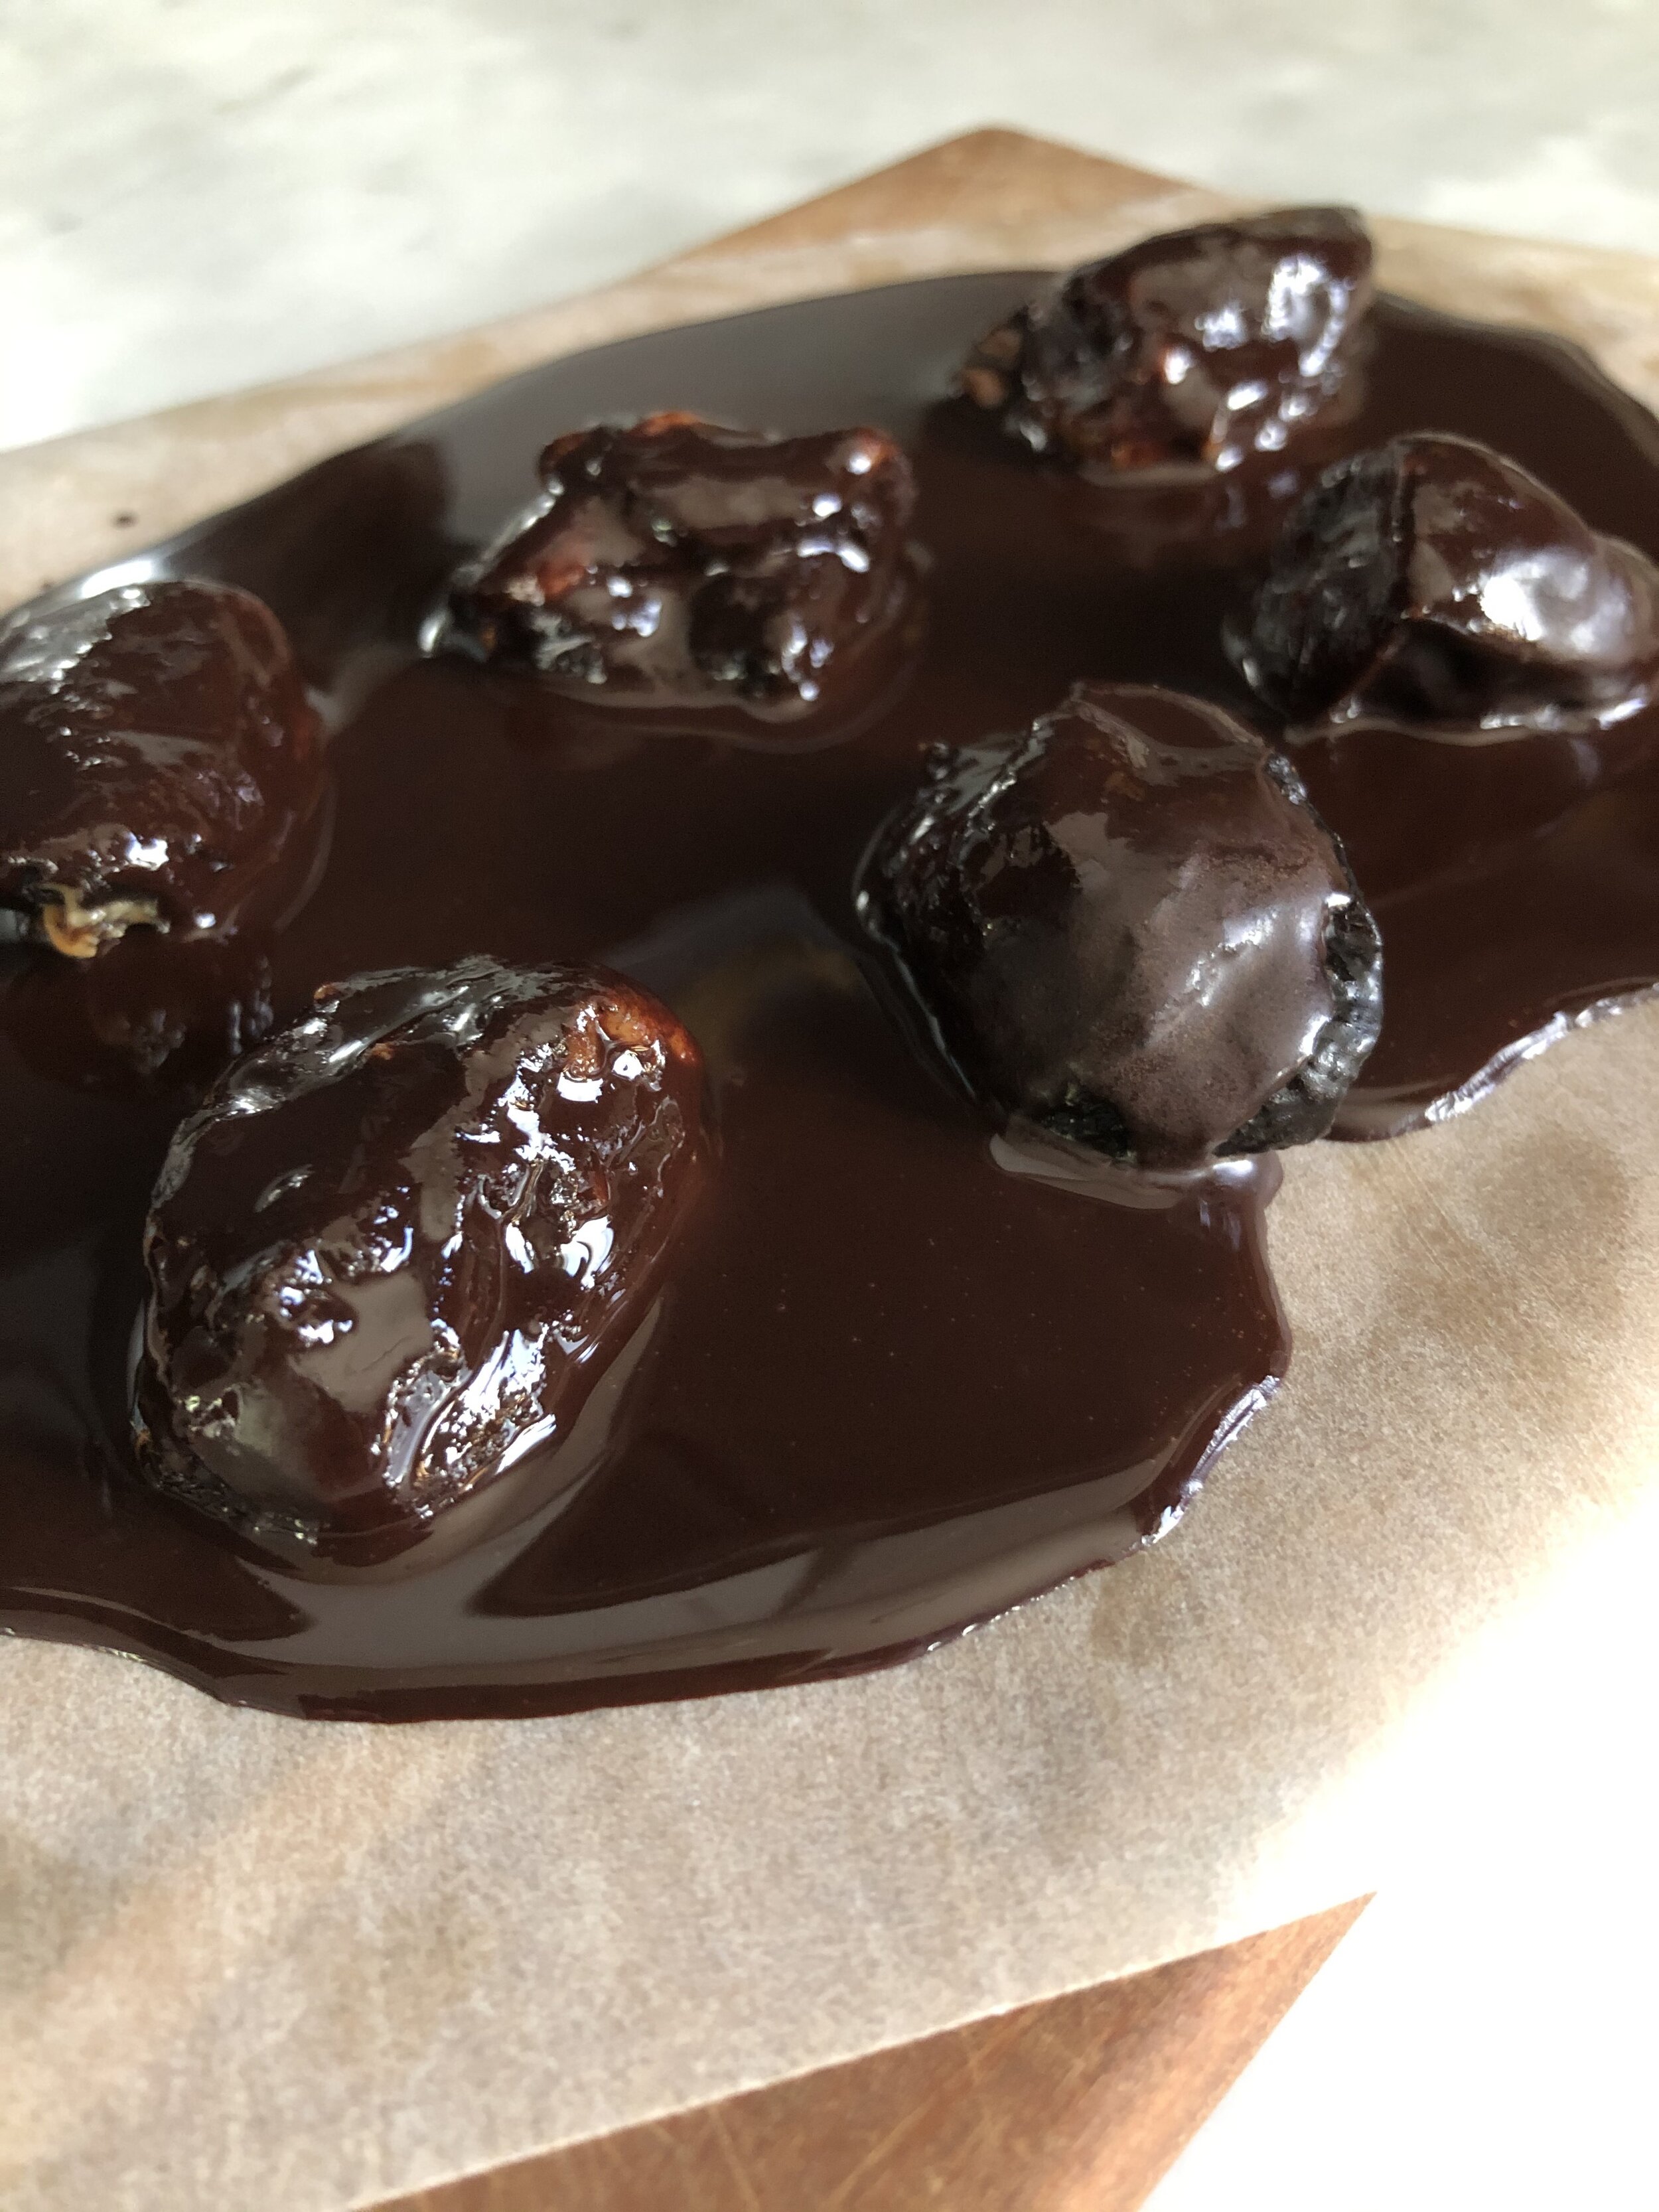
Now take 6-8 of your stuffed plums, and place on a piece of wax or parchment paper, arranged about a 1 inch apart from one another. Now take your saucepan with the melted chocolate, and spoon the chocolate over each plum. This will create one big “bar” of chocolate and plums-this is good!

IMG_3177.jpg

Now place your chocolate in a cool place (or if it’s summertime, the fridge) until the bar is entirely set. This should take 1-2 hrs. Now with a knife, cut your plums out of the bar, and you will now also have little pieces of plain lactation chocolate to nibble on too!

Store chocolate covered plums & chocolate bits in the fridge-the coconut oil in the chocolate will cause everything to melt if it gets too warm.

ENJOY!

IMG_3181.jpg

…………………

*Constipation is a very common during the postpartum period, and can cause a lot of added distress and discomfort to bathroom visits. I liked to stay ahead of it, and snacked on these plums and other high fiber snacks frequently throughout the day to keep my bowel movements regular.

………………..

My recipes are always free, but I do ask that you contribute to the organization or individual who needs assistance or support receiving reproductive care. We are continuing to raise funds for Mitchell, a local Penobscot artist located in Portland ME, and expecting her first child this year. Please make sure to donate to her birth fund HERE.

Mother's Porridge

A warm bowl of rich & fatty oatmeal became ritual, and fortified my morning hunger pains during the first two months of my postpartum time with Emmer. A little sweet, a little salty, and deeply comforting, this is a simple meal you throw together for the mama in your life within a matter of 15 minutes.

The trick with oatmeal is to remove your pot from heat, a little before your porridge is as thick as you would like it-it will continue to cook and get thicker as it sits! I like to remove mine from the heat while its still a bit soupy, and by the time I am seated and ready to eat, it is the perfect thick custard consistency. The addition of egg yolks and grass fed butter make this meal rich in fat and choline-two essential aspects of the postpartum diet!

MOTHER’S PORRIDGE

Makes 1 generous portion

1/2 cup organic thick rolled oats (I love Maine Grains)

1 1/3 cup water

salt to taste

1 1/2 tablespoons grass fed butter (I love Kerrygold)

2 egg yolks

1-2 tablespoons maple syrup or honey to taste

1/3 cup organic berries, frozen or fresh

Chopped roasted nuts and seed of choice- (we roast a big batch ahead of time, and blitz in our food processor, then store in a jar! This way, they are ready to spoon onto anything really…)

Ground Black Sesame Seed (Optional)

In a small sauce pan, bring your water and salt to a boil. Lower heat to medium-low, stir in your oats, and continue to gently stir frequently. Oats will take 10-15 minutes to cook, you are looking for a thick soup consistency. Meanwhile in a small saute pan over very low flame, gently heat your berries for 3-5 minutes-if you are using frozen, cook until they get just a bit saucy. If using fresh berries, just take the chill of them a bit, and mash gently.

When oats have achieved a thick soup appearance, add your butter, egg yolks, and maple syrup or honey and stir to fully combined. Remove form heat, your porridge should now look like custard! Pour into a medium sized bowl, top with your gently warm berries, chopped nuts, and ground black sesame if using. Enjoy immediately!

If you have enjoyed this recipe,

please consider donating to this GoFundMe raising funds for a local Penobscot Woman’s upcoming Birth.

Many Thanks!

The Birth of Emmer Gael

The week between Christmas and the New Year greeted me with gentle signs that my body was preparing for birth. I would have daily mild contractions, beginning in the late afternoon and lasting through dinner, before tapering off by the time we tucked into bed for the night. Every few days I would alert my midwives of activity (contractions that would feel stronger, or closer together) but they never seemed to take off.

On New Years Day morning, I woke up and went to the bathroom. While wiping, I noticed a bit of pale pink bloody mucus, a sign that labor is not far off…I didn’t get too excited-days on end of sporadic contracting had conditioned me to keep cool, and not think too much into it. I texted my midwives the good news, and we all carried on with the day. My husband, Caleb made us a delicious breakfast and our three year old, Burleigh spent much of the day shoveling snow in our backyard, while Caleb sculpted the most majestic dragon head out of our snowbank.. It was around 4pm, when Caleb came into our room, letting me know that my dear friend was here with some goodies for when I go into labor; a gallon of laboraide, date balls, and some little tokens for Burleigh and this new baby. I had been taking a midday nap, which had become ritual during the last months of pregnancy and I didn’t get up to see her. I was not conscious of it in the moment, but my body was most certainly turning inward-much like animals do in the hours leading up to labor. I was quiet, the house was quiet, and my body was beginning to prepare for the birth of our baby.

It was around 6pm when I noticed the contractions taking all of my focus, and coming in waves closer and closer together. I texted my midwives the update, and for the next half hour (while we ate dinner) I timed them as they came. After a half hour had passed, I looked at my timer and realized that they were coming every 3 minutes or so, and lasting for 30-45 seconds. This was progress! I let my midwives know and settled in on our bed for the next hour as contractions continued in waves. Meanwhile, Caleb began filling the birth tub at the foot of our bed, and my sister, Claire took over duties with Burleigh and they began covering every heating surface in the house with pots of water to boil, in case our hot water ran out while filling the tub. It got to be 7:30pm, which on any other day is Burleigh’s bedtime, but Caleb and I had felt really strongly about letting him decide when and if he wanted to be with us during the birth, and so we let him stay up! As soon as Caleb had the tub filled a little past 8pm, I got in and it felt incredible…Caleb had been texting with our midwives throughout the evening, and they decided it was time to head over. Caleb also called our 3 dear friends who we had asked to join the birth (they are a few of Burleigh’s favorite people, and we felt that the more love and support he had during my labor, the more comfortable he would feel) and they began heading our way too.

By 9:30 our house was filled with the sounds of preparing. Our midwives were settling in, setting up their supplies and checking in on me and the baby’s heart rates. Our friends had settled in our living room, right outside of our bedroom where I was laboring, and were playing with Burleigh and keeping good company. I was becoming more and more vocal as the contractions increased in length and strength! As each contraction came, and with it my deep animal like moans, Burleigh would stop his play and come into our room to check on me and make sure I was alright. At one point late in the labor I remember him sitting at the foot of our bed, locking eyes with me as a contraction began to come, and saying to me “I’m keeping you safe mama, it’s ok!” and then turning to our midwife and checking in with her, “isn’t this crazy, Hannnah?!” He was so present, and aware of all that was happening, and also being held safely by all of the strong women around him that offered continued reassurance that yes, everything is ok, mama is ok…

By a little past 10pm, I was beginning to sense a shift in my laboring sensations, and intuitively felt as though pushing was not too far off. However, my rational brain could not wrap my head around this….How could this be?? I am feeling so good! The lights are on! I’m still talking to everyone! I know exactly where Burleigh is, and just gave him a kiss a moment ago! All of these factors were in such opposition of my previous birth experience with Burleigh, which I was not at all present for, was out of my mind uncomfortable, needing every ounce focus and every light and noise off.

At that point I knew that I needed a mental shift if I was really as close as I thought I was to meeting our baby! I asked my midwives between contractions how far along they thought I was (they had not yet checked me) and they both agreed I was likely near 9 cm dilated, which blew my mind… I surrendered my body to the next contraction, and then asked my midwife, Mell to check me. She confirmed that I was 9.5cm with a very small cervical lip, but that I should just follow my body and let it lead me.

With that information I was able to begin letting my body really take over. I began pushing with the next contraction. On the first push his head began to crown, and I reached down to feel his head right there, ready to come out! The next contraction came and lasted long enough for me to give three big pushes, and he somersaulted out of me, and into the water-it was 11:07pm, and Emmer was here with us earthside! I immediately yelled for everyone to get Burleigh-my pushing had been so fast that he wasn’t in the room when Emmer had emerged! Mell gently guided Emmer to me under the water, and when I lifted him up, I locked eyes with him for a moment before thinking to myself, “here is our daughter!” Ha! I then hugged him to my chest for the next few minutes, sobbing and taking in all of his first cries and gazes-he was so perfect and beautiful, and his little rolls were pinking up quickly. After a few minutes we lifted him up to fully examine him, and I laughed as I looked down and saw his little penis-once again a reminder that I have a lifetime of learning and grace with this little one.

A few minutes after Emmer’s birth I felt a gush, and the birth pool turned pink. Having experienced a very substantial hemorrhage with Burleigh immediately following his birth, I knew exactly what was happening. A few more minutes went by and I felt another gush, and the pool got darker. My midwife encouraged me to start focusing on the birth of the placenta. After a few more minutes of pushing, and her gently supporting me, I was able to birth the placenta, and my midwife immediately began getting me out of the tub. Upon standing up out of the water, my body began a third and more significant hemorrhage, and I just knew it was all happening again. My midwives responded immediately by sitting me down on the edge of my bed, our dear friends holding me up as I got a shot of Pitocin directly into my leg, and then a few vials of tinctures that tasted and felt like Fireball. Within seconds my midwives had stopped the bleeding, I remained stable throughout the entire bleed, and my vitals remained stable for the many hours following-bodies are extraordinary, and my body has an unbelievable ability to cope with hemorrhage!

Caleb left Emmer and I to put a very emotional and tender Burleigh to bed. It was hours past his bedtime and he had met every intense moment that night with so much bravery and strength. Caleb took time with him to make sure he felt safe and loved as he drifted off to sleep, before letting my sister take his spot in bed with Burleigh, and rejoining Emmer and I in the next room.

The next few hours were filled with skin to skin snuggling in bed, drinking plenty of laboraide that my dear friend had made for me, eating a nut bars that I had prepared for myself ahead of time, and receiving the most gentle and thorough care from our midwives. I had the unbelievable fortune of not tearing (though if you ask me, all of that collagen rich broth I was drinking throughout pregnancy helped my skin and tissue stay elastic and hydrated), and was able to pee with ease a few hours postpartum!

Emmer was beautiful and so perfect- 8lbs 8oz, and scoring two APGAR scores of 10! He found his latch and was nursing veraciously a half hour following his birth, and remained connected to me until around 12:45pm when we finally had my sister join us to clamp and cut the cord. Our midwives quietly drained the pool and cleaned up our room and started laundry, meanwhile checking my vitals every hour, as we snuggled in for the night. Our friends slowly began tucking themselves to sleep, and we went to bed that first night with every single bed in our house filled with warm bodies, who were there to witness this new life, and holding the four of us in their hearts.